Creating Text Illustrated


This time the tutorial on how where how to make text image using Photoshop. Creating Text Illustrated

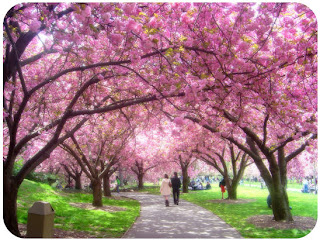
The effect of this pictorial text consists of two important parts. The first part of intangible background image that will fill both the text and the text itself intangible. Therefore, first prepare a background image that will fill in the text. This image can be anything, scenery, people, animals, or a photo model. To mendapatkanya Mbah please search on Google. Importantly, the size is enough to fill the entire text. Let us Immediately to the tutorial!

Creating+Text+Illustrated
Creating Text Illustrated
Step 1
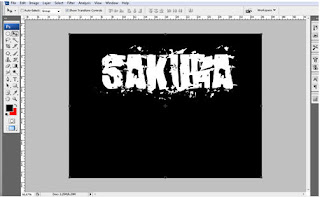
Open the file using Adobe Photoshop CS. Before we work using a background image, we will make the text first. Make a new canvas size 500 × 500 pixels kirakira with a white background. After that, create a new text using the Horizontal Type Tool. You can write text using any font of your liking. The size and any color you can customize your own because there is basically no problem with this.
Horizontal+Type+Tool

Adobe+Photoshop+CS 2

Step 2
Now, you've got a new layer named the same as the text that you typed earlier. So, if the text that you type is "SAKURA" then you will be called cherry layer as well. Perform right-click on the layer and choose resteriza type and control-click on the layer so that the whole text in selected circumstances.
choose+resteriza+type+and+control-click+on+the+layer
Step 3
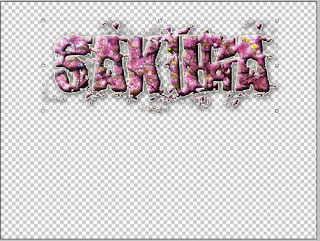
Then activate the background layer, after adding a new layer again, then automatically in the new layer tercopy existing image in the backround. And name the image text.
background+layer
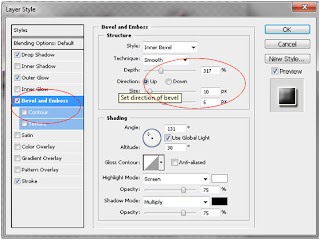
After that add the effects on the blending option, right click on the text layer blending option choose the image, then adds:
  • stroke
blending+option
  •  Drop shadow 
blending+option+Drop+shadow
  •  Outer glow
 blending+option+Outer+glow
  •   Bevel and emboss
blending+option+Bevel+and+emboss

 The final result:
Creating+Text+Illustrated
The Sketch of Text Illustrated

How to Select Color Concept, Forms And Typography In Web Design

How to Select Color Concept, Forms And Typography In Web Design
The first impression of a visitor to the site starting from the first 9 seconds. So how, with the calculation of the download time, a designer can draw the attention of the visitors? The answer is to design a "wonder".

"No wonder" what I mean is as follows:
  •      Good color coordination
  •      layout (lay-out) is good,
  •     and most importantly, fast download.
From looking at the above information, we will discuss how the best way to attract the attention of a visitor is with the use of:

  1. Color as a medium of illumination for the site and the information or product they have. 
  2. Form, something that is often overlooked, is also a design element that is strong enough to form an image, and express an information. 
  3. Typografi (art of typeface usage) currently has a limited implementation in web design, but it is a very important element in communication with the visitors.

1. color

Selection of color is one thing that is very important in determining the response from visitors. Color is the first thing seen by a visitor (especially the background color), and you can make your site to display the first color while the other content (text and images) is still in the process of downloading. This will make an impression or a mood for the entire site.
how+to+choose+a+color+website
To achieve effective color design, can be started by selecting a color that can represent the purpose of your site. Color pallet that you created should match the person and purpose of your site. If for example your site is to a community site, then you should choose warm colors to make the atmosphere more relaxed. If your site is for information sites, where content will dominate, then the color should be simple and unobtrusive (eg do not use background kembang2 with flashy colors).
2. form

Forms can also be used to draw a response from visitors. Effective Use of Forms will psychologically motivate visitors, inspire visitors and provide a challenge to visitors, sometimes without realizing what motivated the visitors, etc.
how+to+choose+a+form+to+website
Form, usually combined to make a stronger impression. For example the use of a Circle and a Seg iTiga, will produce the impression nergetic, and dynamic. Or the use of a circle and a square for the warmth and feeling of safety.

The shape and strength of the combination of forms has been addressed in various fields, such as Automotive, building of, Packaging Products, and Corporate Logo
3.Typografi

Typografi is an art. And is an art that is quite complicated, especially coupled with a medium complexity web design is limited. Fonts on the Web can be made as part of the graph (image), or by way of HTML, or with Style Sheets.

By the way HTML and Style Sheet, sometimes will didapakan unsatisfactory results or less good because of typefaces (form letter) that we use, may not be available at the visitor's computer. If a visitor's computer currently do not have form letters that have been set by the web designer, then that will be used is an alternative view using the form letter or form letter standard (default).
how+to+choose+a+Typografi+to+website
Designer can make choices about the letter that they make a graph (image), and also the general typeface used on the content of the text. So many forms of letters, to hard to say how many fonts that exist in this world.

So it's rather difficult to determine the effects / influence what can be caused to the visitor. However, the letters are divided into several general categories, and usually these general categories has its own style.

Typically, designers will use some kind of style letters on a page. Important Point Title and usually use this type of Decorative and scrip, and the contents of the text almost always have to use a type of Serif or San-Serif (or sometimes use a Monospace).

To affect the visitors in psychology, can by the use of Fonts in accordance with the objectives to be achieved by the use of color and form. How to Select Color Concept, Forms And Typography In Web Design

Tips By : Knowledge-Shared.blogspot.com

Ocean Ripple Effect in Photoshop


This time I will give tutorials make use of filters that have been provided by Photoshop to create unique photo effects. I'll give a little example of the manipulation of images from Adobe Photoshop. And I will give the results of photo manipulation with the name "Ocean Ripple Effect". How? from the name alone let alone the results are cool ..
This is the example of the final result that we will make
Ocean+Ripple+Effect
Step 1
Press CTRL + O to open a picture 1
Open+Object
Step 2
2x click the padlock icon on the background layer
background+layer
make the background into a layer, click OK. when the display appears as below.
Layer+arlet
Step 3
Select the move tool and drag the image onto the
move+tool
Step 4
Press CTRL + O, open the image 2

CTRL-O
Step 5
Select the Move Tool, move the image 2 to image 1
move+the+image
Step 6
Click the Edit menu> Transform> Flip Vertical to flip the picture vertically
Flip+Vertical
Step 7
After the pictures behind the next is the process of filter, click Filter> Distort> Ocean ripple
Ocean+ripple

 Perform the setting value, adjust the photos you use
ocean+ripple+setting
Step 8
Select the elliptical marquee tool and create a circle selection on the bottom
Step 9
Click on Filter> Distort> Zigzag
Click+on+Filter+Distort+Zigzag
Setting the value adjusted to the size selection
Setting+the+value+adjusted+to+the+size+selection
Step 10
Press CTRL + D to delete the selection, so a tutorial from me, thanks :)
CTRL+D+to+delete+the+selection
Ocean Ripple Effect

Creating a hard disk partition in Windows 7


Partitioning hard drive (Disk Partitioning) is divided into several sections Hardisk, commonly referred to as Partition. In windows operating system, usually starting with Drive C:, and can continue until Z:. With the growing size of hard disk size, then the hard disk is preferably in the partition into several parts. The division of hard drive into several sections that are used to simplify file management.

Benefits of Mem-partition hard disk:

     Split between the operating system files and data or documents.
     As a place for Virtual Memory operating System. Like for example on Linux
     Keeping the location of programs or data that are used close together. This is in addition to accelerating the execution of the program is also more efficient.
     Used to boot or run more than one Operating System,
     Protect or separate files for easy recovery of data when the system is broken. Because if one partition is damaged, the other partitions will not be affected so that data can still be saved.
     Improve overall performance (performance) on a computer system

Inside Windows 7 has a feature to create a partition without having to install additional software like partion magic, etc..

To create a new partition is very easy, the following steps:

step 1

Click the start menu - Right-click Computer Manage, as shown below:
Click+the+start+menu+-+Right-click+Computer+Manage
Step 2

After the Select Disk Management - Select the Drive you want to share, then right-click - Select Volume Shirink.
Shirink+Volume
Step 3
Then specify the number of volumes to be made, in this case I want to make partition of 14000MB or 14GB.
specify+the+number+of+volumes

Step 4
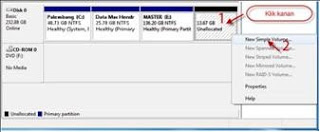
Wait until the process is complete, then the partition will grow. Right click on the new partition click New Simple Volume.
New+Simple+Volume
Step 5
The process of making the new drive starts, click Next to proceed to the next stage. After that we will be asked to determine the amount of volume of the drive you want made.
the+amount+of+volume+of+the+drive
Step 6
Then we asked also to determine the driver letter, please be adjusted.
determine+the+driver+letter
Step 7
Next we must determine the format of the drive and label of the drive we want to make.
determine+the+format+of+the+drive
Step 8
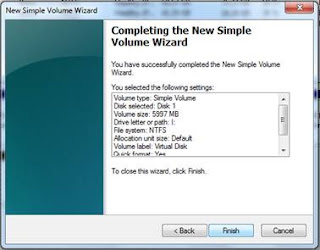
Click Finish.
Complate+the+new+winzard
Step 9
Open Windows Explorer to check the partition that's been made earlier

Good luck Creating a hard disk partition in Windows 7

How To Make Your Own Portable Applications

How To Make Your Own Portable Applications

Make Your Own Portable Applications

Portable applications become a practical solution for you who often use a PC, because it no longer need to carry a notebook everywhere. Simply tenteng only important documents and bring the program that is usually used. Everything can be stored in a USB flash drive or portable hard disk.

When they reached their destination, whether it be office, place of presentation, or cafe, you do not have to worry if the computer that will be used does not have the required software. Just plug a portable drive, then everything matters so smoothly. Applications of this type did not suck hard disk space for its tiny size.

The problem is, there are times when you need portable applications not available in cyberspace. If the conditions are like this, you can turn it into a version of "tenteng" independently.

Easy with Portable Application Creator

     Many ways to make your own portable applications. One way is to use an application Portable Application Creator - Beta 0972 (from www.jonnyfartypants.com or download it directly on the

http://www.megaupload.com/?d=FDYXE8SP).

This application can help you to install an application into a USB flash disk and make it portable alias can be used on any computer without the need to be installed again. Here's how:
First Steps

Download the first file, then extract to your hard disk. Next, make sure the flash disk that is used for the installation of the application has been plugged into the USB port on your PC. Then open the extracted folder earlier.
Step Two

Double-click the file "PAC Compiler.exe" until the dialog box "PAC Compiler" appears. This application will find applications in hard disk AutoIt.exe. If no, the application will offer to download it from the internet. Click [Yes]. Tunggui downloaded entirely up to the application. If so, click [Done].
Three Steps to

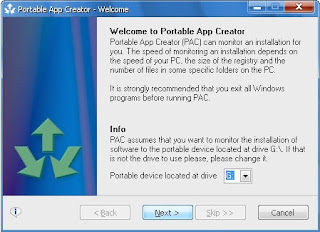
File "PAC Compiler.exe" will be changed to "Portable App Creator.exe". Double click the file. In the dialog box "Portable App Creator", select your flash disk drive in "Portable device located at the drive".
Portable+App+Creator.exe
The Four Steps

Click [Next]. Click [Browse ...], and then locate the file that the installer of the software will be portable. Click on the installer file with extension. Exe, and select [Open]. Here, I use CC Cleaner application installer file. Click [Next].
Portable+App+Creator+Browse
The Five Steps

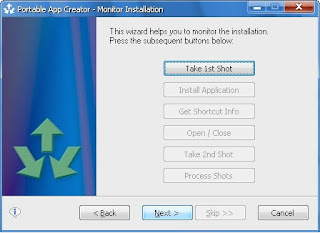
Now you will be faced with the installation wizard. Click [Take 1st Shot]. If the process is complete, click [Install Applications]. In this process, which will be used as a portable application will be installed.
Install+Applications
The Six Steps

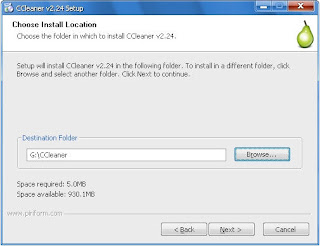
Make sure you select the flash drive directory as the "Destination Folder" during installation. If not, the application will not be installed to the flash drive. Follow the installation process to its conclusion. Close the installation wizard, then return to the Wizard in "Portable App Creator".
Wizard+in+Portable+App+Creator
 The seventh step

Click the [Get Info Shortcut]. Specify file applications installed on a flash drive on the "Get the location of the application to run" by clicking the [Browse]> [Open]. Determine the location of the application shortcut in the "Get the location for the launcher". Click [Next]. Click [Open / Close] to test the application. If successful run, close the application window.
Get+the+location+for+the+launcher
Step eight

Click [Take 2nd Shot], followed by [Process Shots]. If you are finished, click the [Next]. Wait again until the button [Done]. Click on the button. Now the application has been successfully installed on a flash drive and can be used at any time and in the computer (Windows) anywhere.

Utilizing Universal Extractor & WinRAR

In addition to the above, you also can use Universal Extractor software (which can be downloaded from http://legroom.net/software/uniextract # download the 4.98 MB file size) and compression software WinRAR (its trial version can be downloaded from www . rarlab.com). Applications that want to be portable should be the installer file, with extension EXE, not a program that has been installed into a PC or other formats. Let's get started.

Step 1
Download and install Universal Extractor and WinRAR to a PC. Open Windows Explorer. Prepare an installer program that would be used as a portable application.

Step 2
Store in separate folders so easy. For example, I use Mozilla Firefox installer file. Right-click the installer file, and select [UniExtract to subdir].

Step 3
Wait a few moments until the extraction process, as indicated by the appearance of the Command Prompt box.

Step 4
If the confirmation box appears containing the previous selection of extraction mode, select the top option, then click [OK]. Results after the extraction process is a folder with the same name as the file installer.

Step 5
Open the extracted folder by clicking-dobelnya. If the lot contains a selection of folders, find the folder that contains files with extension EXE application.

Step 6
In Mozilla Firefox, the application file named "firefox.exe" and is in the folder "nonlocalized". Selection of all the contents of the folder by pressing [Ctrl] + [A], then click the right mouse button and select [Add to archive ...] for compressing data via WinRAR.

Step 7
In WinRAR box that appears, type a file name portable applications on the "Archive name". Click [Create SFX archive]. On the menu "Compression method", select [Best]. Next, click the [Advanced] followed by clicking the [SFX Options ...].

Step 8
On the "General" tab, fill in box stuffing "Run after extraction" with the file name extension EXE application that you found in Step 3. For Firefox here, I fill it with firefox.exe.

Step 9
Click on the tab [Modes], then select [Unpack to temporary folder]. Click [Hide all] in "Silent mode", and [Overwrite all files] on "Overwrite mode". Click [OK], and click [OK] again on the dialog box Archive name and parameters. Wait a few moments until the compression process is completed.

Step 10
Now in the folder that you manage will emerge a new file extension EXE with a name that matches that have been entered in Step 4.

Well, now your application has now become portable. Staying put the EXE file into the flash drive and run directly on any computer, with double-clicking the application files are portable.

Hopefully useful! and good luck ^ _ ^
How To Make Your Own Portable Applications

Advanced painting using Photoshop

"Sketching Sketch Painting"

My tutorial times will be discussed, the simple effects that can be created from the merger of the existing features in Adobe Photoshop program. Sketch face can be made by a former painter. Sketch of the painting is in need by a reliable painters, so that painting is more optimal results and avoid mistakes. But this time I will make sketches with Adobe Photoshop. As we know, there are many tools that we find in Adobe Photoshop, in this tutorial, we will both make a sketch effect, maybe my friends had seen the previous article the Create Sketch In Just 5 Minutes of Photoshop. Similar results are right? and turns with the different tools we can create the same results. Well .. Now my friends may choose which steps you think you can use with as comfortable as possible.

Happy at work ^ _ ^

The final results will be made
 Step 1
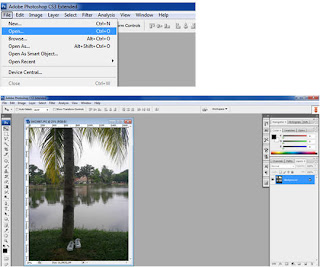
Open the Adobe Photoshop program. Click the file menu> Open> select the image,> then end open.

Step 2
Double click the background layer, so the screen turns into layer 0.Klik 2x (so it turns into layer 0)

Step 3
Click menu Image> Adjustment> Black and White
In the dialog box that appears, do the following settings:

Then finish by pressing ok.
(In setting this value can be done according to the needs of each)

Step 4
Duplicate the layer 0 (Ctrl + J). At layer 0 copy, click the image menu> Adjustment> Inverse (Ctrl + I)
Make sure Layer 0 copy is active,
Step 5

click Filter> Blur> Gaussian Blur
Still on Layer 0 copy, change the blending mode to Linear Dodge (Add) In the dialog box that appears enter a radius value of 9.5 pxl.
Now the vignette effect is complete, do not forget to save. Click the file menu choose Save (Ctrl + S).
Final Results
How? results were also baguskan? like the words we often hear "A lot Road to Rome".

Ok, until I met him again in the next tutorial ...

Continue to work with
Photoshop!

 
Free Host | new york lasik surgery | cpa website design