Showing posts with label Photoshop Editting. Show all posts

Is It Real Or Is It Photoshop?

Is It Real Or Is It Photoshop?

Browsing Slashdot for my dose of tech news (and something to write about in this space, of course) when I ran across an interesting news item. Researches at Dartmouth University have come up with a new software algorithm that can analyze a photo and determine just how Photoshopped it is. This might have implications for law enforcement but I'm not sure how photographic evidence gets handled these days when anyone with some decent 'shopping skills can fiddle with a digital image on their home computer.

However, the real thrust of the project was intended to shed light on just how over-edited images in mass media are. If you've seen a poster for an upcoming movie like Sherlock Holmes 2 or a photo spread of the latest fashions in Vogue - you've undoubtedly seen the long arm of Photoshop working that magic that superimposes Robert Downey Jr. and Jude Law on a dark London street or touches up the blemishes on that supermodel's skin.

Basically, they want to bring more attention to the fact that mass media has long been believed to promote an unhealthy self-image for women, given the constant influx of media focusing on making women as attractive as possible by erasing any and all discernible flaws in the photos we're presented with. The proposed software would analyze a photo it's presented with and give a ranking from 1 to 5 based on the level of alteration, rather than just flagging a photo as "altered" or "not altered". I definitely agree with this - we definitely put way too much emphasis on physical beauty standards that can't be achieved by everyone. There's certainly plenty of truth to the saying "If you look good, you feel good" - eating right, getting exercise and taking care of yourself is important, but trying to look like the flavor of the minute in your favorite fashion magazine is not healthy, especially when they've probably got an army of personal trainers, makeup artists and photographers making sure they look exactly the way the magazine wants them to.

At the same time, there's also a push for legislation by certain groups that would require altered photos to be labeled as such. I'm not so much a fan of this - it seems like a slippery slope towards "Man receives 20 years for altering photo of his kids" or something. Truth in advertising is important (like the good old days of 1950s cigarette commercials that featured doctors puffing away and praising the benefits of smoking) but I would say it's much more important to raise public awareness of the fact that Photoshop is used in the media so heavily. The article I read did mention that women's magazines are getting more responses from readers asking for celebrities to "look good, but real," so we may be seeing a backlash finally that will carry more weight than any attempt to legislate it will.           

Photoshop - All About RBG - CMYK


Photoshop - All About RBG - CMYK
Photoshop - All About RBG - CMYK

RGB = Pink Green and Blue
It is an additive color system which is used in things like TV's, Laptop Screens.
It has a wider vary of colors than CMYK however it cannot be printed as an alternative if you print of a RGB image it's converted into CMYK image.
CMYK = Cyan, Magenta, Yellow and Keycolour (which is black)
It is a subtractive colour system and is used for all the things within the print industry from newspapers to fine art prints. All printed media is makes use of a CMYK color system.
Not like RGB which merges numerous colors to get black, CMYK has its own black it does not need to merge colours if it did plenty of color ink can be wasted.
CMYK does have a extra limited range of colors accessible to it (or gamete) nevertheless it does have more yellows obtainable to it than RGB.
HSB = Hue Saturation Brightness utilizing a mixture of these three issues we can get any color that's accessible on computers.
The Hue = colour
Saturation = how a lot color i.e. a low saturation is extra black and white while a excessive saturation may be very bright.
Brightness= effects how a lot white or black is put in or taken out of the image.
Beneath each image in Photoshop there's usually 2 numbers which relate to file size. The number on the left hand aspect represents the file measurement of the unique picture layer, the quantity to the right represents the full file dimension for the unique layer and all the other layers which were added.
A few of the modes obtainable in Photoshop these are.
Index color mode that solely makes use of colour that's inside the image some other sort of colour accessible is stripped from the file. If you where to have a look at the color palette it would show all the colors that accessible within the image. When changing an image into Index colour you'll be able to choose what number of colors are used.
Posterize we where told and shown may do much the same as index colour both enable uses to pick out what number of colours are used.
Greyscale which removes all color from the image
A helpful tip is that to continually resample photos is unhealthy as each resample loses more and more information. It's at all times a good idea not to continually resample jpeg pictures as every resample damages and destroys image knowledge within a file. It's best to avoid wasting photos in a file format that doesn't resample photographs after which make a copy of the picture and convert the copy right into a jpeg. That method you possibly can always have a superb unique image to archive and use.
The ultimate tip of the lesson was that it was sensible that the perfect picture file dimension for a webpage or web site was 20k and that photos should never go over 100k otherwise the webpage would take a long time to load.
For web sites a low decision 72dpi was all that was wanted as 72dpi is the webpage customary setting. And the mode was RGB as RGB works greatest with computer and TV screens.
For a magazine a high resolution was wanted as printers can print to a higher high quality, the decision was 300dpi. And the mode was CMYK which is the only print mode that printers and printed media can use.

Photoshop - Using a Layer Mask to Blend Two Photographs


Photoshop - Using a Layer Mask to Blend Two Photographs


Hi. This tutorial is based on using a layer masks to merge two images. Right now, I'll make this dinosaur appear on this seashore, simply into the water. Layer masks are quite simple to make use of, and likewise very useful! They work on a black - white - grey system. This tutorial will explain further.
Step 1: Getting the photographs
Open your first picture, on this case it is the beach. Then open your second picture (in this case, the dinosaur) and move it onto the first image, this may be completed by merely dragging it with the arrow tool!
Step 2: Creating a layer mask
As I said, layer masks make use of black, white and gray. To add a layer masks, merely click the rectangle with the circle inside; backside of your layer window.
Step 3: Hiding the excess areas
We only need the dinosaur here, so let's get rid of the remainder! Take the brush device, with the brush software we can use these colors;
Black = disguise
White = unhide
Gray = partially disguise
The shade of your colour decides the opacity of the area you brush. Brush black over the areas you want rid of, see what occurs!
Now, you'll must zoom in (Ctrl + +/Ctrl + -) to get it carried out accurately... In case you make a mistake, do not use undo, simply brush with white.
Step 4: Opacity
In this picture, I need the legs to be in the water, this implies I would like their opacity lowered so it seems to be just like the legs are beneath water. For this, we'd like a grey colour. Watch as I brush with the gray! As you can see, I've brushed gray and his leg now seems to be partially hidden! Having picture hosting issues atm, Photobucket being unhealthy!
That is it!

How to Change the Custom Shape Tool Being Brush

How to Change the Custom Shape Tool Being Brush
Brush in Photoshop, is a major tool for painting. Brush in photoshop can be added by downloading and make it your own. On this occasion, I use the Custom Shape Tool is used as a brush, and add it to the photo. Let us clay together, how the process of manufacture .. Immediately, we are into the tutorial ..

Outcomes that we will make

How+to+Change+the+Custom+Shape+Tool+Being+Brush

Step 1
Open the program Photoshop, then create a new sheet with the following provisions:
custom+size+setting

Step 2
Enable the Custom Shape tool, select the shape type "Heart Card"

Custom+Shape+tool


Hold down the Shift key on the keyboard so that the form of proportional shape, then drag the shape.

Step 3

Then click the edit menu, select "define brush preset." In the dialog box that appears give the name of the brush, and end Ok.
Step 4
To be made ​​brush can be used. This time I added brushes on a photo

brushes+on+a+photo

Activate the Brush tool, on the menu bar select a brush that has been made ​​earlier. Then Activate the Brush Palette also (f5), which exist in addition to the right. And do the settings as follows.

Activate+the+Brush+tool
Step 5
After completing the settings, create a new layer, and change the foreground color to red and pink background. Then brush the brush as you wish.
 Now living in the save. This stage can still be added another ornament. To be more attractive.
Good luck ^ _ ^

Creating Text Illustrated


This time the tutorial on how where how to make text image using Photoshop. Creating Text Illustrated

The effect of this pictorial text consists of two important parts. The first part of intangible background image that will fill both the text and the text itself intangible. Therefore, first prepare a background image that will fill in the text. This image can be anything, scenery, people, animals, or a photo model. To mendapatkanya Mbah please search on Google. Importantly, the size is enough to fill the entire text. Let us Immediately to the tutorial!

Creating+Text+Illustrated
Creating Text Illustrated
Step 1
Open the file using Adobe Photoshop CS. Before we work using a background image, we will make the text first. Make a new canvas size 500 × 500 pixels kirakira with a white background. After that, create a new text using the Horizontal Type Tool. You can write text using any font of your liking. The size and any color you can customize your own because there is basically no problem with this.
Horizontal+Type+Tool

Adobe+Photoshop+CS 2

Step 2
Now, you've got a new layer named the same as the text that you typed earlier. So, if the text that you type is "SAKURA" then you will be called cherry layer as well. Perform right-click on the layer and choose resteriza type and control-click on the layer so that the whole text in selected circumstances.
choose+resteriza+type+and+control-click+on+the+layer
Step 3
Then activate the background layer, after adding a new layer again, then automatically in the new layer tercopy existing image in the backround. And name the image text.
background+layer
After that add the effects on the blending option, right click on the text layer blending option choose the image, then adds:
  • stroke
blending+option
  •  Drop shadow 
blending+option+Drop+shadow
  •  Outer glow
 blending+option+Outer+glow
  •   Bevel and emboss
blending+option+Bevel+and+emboss

 The final result:
Creating+Text+Illustrated
The Sketch of Text Illustrated

Ocean Ripple Effect in Photoshop


This time I will give tutorials make use of filters that have been provided by Photoshop to create unique photo effects. I'll give a little example of the manipulation of images from Adobe Photoshop. And I will give the results of photo manipulation with the name "Ocean Ripple Effect". How? from the name alone let alone the results are cool ..
This is the example of the final result that we will make
Ocean+Ripple+Effect
Step 1
Press CTRL + O to open a picture 1
Open+Object
Step 2
2x click the padlock icon on the background layer
background+layer
make the background into a layer, click OK. when the display appears as below.
Layer+arlet
Step 3
Select the move tool and drag the image onto the
move+tool
Step 4
Press CTRL + O, open the image 2

CTRL-O
Step 5
Select the Move Tool, move the image 2 to image 1
move+the+image
Step 6
Click the Edit menu> Transform> Flip Vertical to flip the picture vertically
Flip+Vertical
Step 7
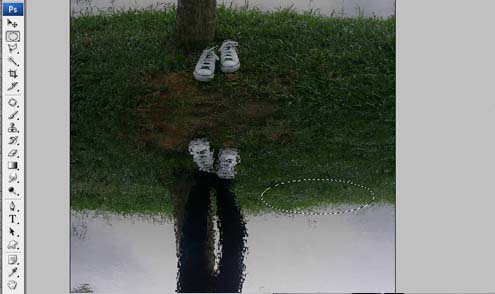
After the pictures behind the next is the process of filter, click Filter> Distort> Ocean ripple
Ocean+ripple

 Perform the setting value, adjust the photos you use
ocean+ripple+setting
Step 8
Select the elliptical marquee tool and create a circle selection on the bottom
Step 9
Click on Filter> Distort> Zigzag
Click+on+Filter+Distort+Zigzag
Setting the value adjusted to the size selection
Setting+the+value+adjusted+to+the+size+selection
Step 10
Press CTRL + D to delete the selection, so a tutorial from me, thanks :)
CTRL+D+to+delete+the+selection
Ocean Ripple Effect

Advanced painting using Photoshop

"Sketching Sketch Painting"

My tutorial times will be discussed, the simple effects that can be created from the merger of the existing features in Adobe Photoshop program. Sketch face can be made by a former painter. Sketch of the painting is in need by a reliable painters, so that painting is more optimal results and avoid mistakes. But this time I will make sketches with Adobe Photoshop. As we know, there are many tools that we find in Adobe Photoshop, in this tutorial, we will both make a sketch effect, maybe my friends had seen the previous article the Create Sketch In Just 5 Minutes of Photoshop. Similar results are right? and turns with the different tools we can create the same results. Well .. Now my friends may choose which steps you think you can use with as comfortable as possible.

Happy at work ^ _ ^

The final results will be made
 Step 1
Open the Adobe Photoshop program. Click the file menu> Open> select the image,> then end open.

Step 2
Double click the background layer, so the screen turns into layer 0.Klik 2x (so it turns into layer 0)

Step 3
Click menu Image> Adjustment> Black and White
In the dialog box that appears, do the following settings:

Then finish by pressing ok.
(In setting this value can be done according to the needs of each)

Step 4
Duplicate the layer 0 (Ctrl + J). At layer 0 copy, click the image menu> Adjustment> Inverse (Ctrl + I)
Make sure Layer 0 copy is active,
Step 5

click Filter> Blur> Gaussian Blur
Still on Layer 0 copy, change the blending mode to Linear Dodge (Add) In the dialog box that appears enter a radius value of 9.5 pxl.
Now the vignette effect is complete, do not forget to save. Click the file menu choose Save (Ctrl + S).
Final Results
How? results were also baguskan? like the words we often hear "A lot Road to Rome".

Ok, until I met him again in the next tutorial ...

Continue to work with
Photoshop!

 
Free Host | new york lasik surgery | cpa website design